> ## Documentation Index
> Fetch the complete documentation index at: https://docs.apiyi.com/llms.txt
> Use this file to discover all available pages before exploring further.
# CLI 対話式セットアップ
> OpenClaw のオンボードウィザードと CLI コマンドを使って、OpenClaw をすばやく設定します
## セットアップウィザード(新規ユーザーに推奨)
初めてご利用の際は、すべての設定を完了するためにセットアップウィザードを実行してください。
```bash theme={null}
openclaw onboard
```
### 手順 1: モデルプロバイダを選択
**Model/auth provider** の一覧で、最下部までスクロールして次を選択します。
```text theme={null}
Custom Provider (Any OpenAI or Anthropic compatible endpoint)
```
### 手順 2: API Base URL を入力
**API Base URL** フィールドに、APIYI のエンドポイントを入力します。
```text theme={null}
https://api.apiyi.com
```
### 手順 3: API Key の入力方法を選択
API key の提供方法を尋ねられたら、次を選択します。
```text theme={null}
Paste API key now
```
### 手順 4: API Key を貼り付け
APIYI token(API key とも呼ばれ、`sk-` で始まります)を入力フィールドに貼り付けます。
token の取得方法:
1. APIYI Token Management ページを開きます: `https://api.apiyi.com/token`
2. 種類が **従量課金優先** のデフォルト token を見つけます
3. その token の行の一番右にある、「アクション」列で、**最初のコピー ボタン** をクリックします
4. これで `sk-` が付いた token(API key)がコピーされます — ここに貼り付けてください
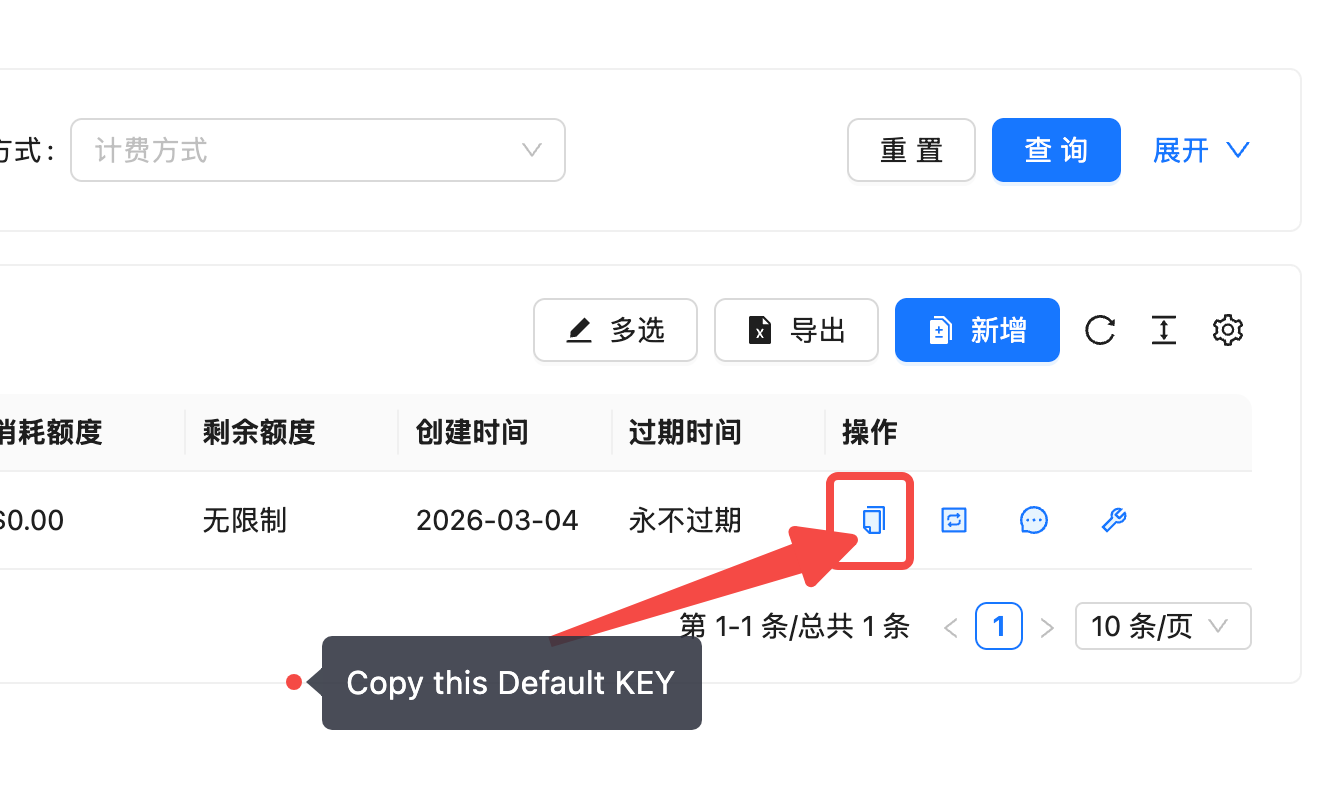 新しい token を作成する必要はありません — システムが生成したデフォルトの「従量課金優先」token をそのまま使用します。
### 手順 5: エンドポイント互換性を選択
**Endpoint compatibility** オプションで次を選択します。
```text theme={null}
OpenAI-compatible (Uses /chat/completions)
```
主に Claude モデルを使用し、Prompt Caching などのネイティブ機能が必要な場合は、代わりに `Anthropic-compatible` を選択できます。詳細は [Anthropic Native Configuration](/ja/scenarios/agent/openclaw/config-anthropic) を参照してください。
### 手順 6: Model ID を設定
**Model ID** フィールドに、使用したいモデル名を入力します。例えば:
```text theme={null}
gpt-5.4
```
その他の選択肢: `claude-sonnet-4-6`, `deepseek-v3.2`, `gemini-3.1-pro-preview`, など。
### 手順 7: 検証して完了
OpenClaw は自動的に設定を検証します。成功すると、システムは **Endpoint ID**(例: `custom-api-apiyi-com`)を生成し、セットアップ完了となります。
検証プロセスでは、まれにエラーが返ることがあります — 通常は再試行で成功します。何度も失敗する場合は、API key が正しいことと、ネットワーク接続が安定していることを確認してください。
### 設定サマリー
| パラメータ | 値 |
| ------------- | ----------------------------- |
| Provider | カスタムプロバイダ |
| API Base URL | `https://api.apiyi.com` |
| Compatibility | OpenAI互換 |
| Endpoint ID | `custom-api-apiyi-com` (自動生成) |
## 設定を変更する
初期設定後、`configure` コマンドを使って対話型設定に再度入ります:
```bash theme={null}
openclaw configure
```
以下の項目を設定する対話型設定メニューが開きます:
* モデルプロバイダーとデフォルトモデル
* チャットチャネル設定
* スキルの有効化/無効化
* ゲートウェイパラメータ
## 単一設定コマンド
個別の設定項目をすばやく確認・変更できます:
```bash theme={null}
{/* View current config value */}
openclaw config get agents.defaults.model.primary
{/* Set config value */}
openclaw config set agents.defaults.model.primary "apiyi/gpt-5.4"
{/* Set API key */}
openclaw config set models.providers.apiyi.apiKey "sk-your-key"
```
## Web UI 設定パネル
Dashboard を起動したあと、ブラウザでも設定を管理できます:
```bash theme={null}
openclaw dashboard
```
`http://127.0.0.1:18789/` を開くと、設定ページにアクセスでき、次のことができます:
* モデル設定を視覚的に編集する
* chat チャネル接続を管理する
* 設定済みのスキルを表示して切り替える
* ログと実行状況をリアルタイムで監視する
## サービスを開始する
設定後、ゲートウェイを起動します:
```bash theme={null}
openclaw gateway start
```
設定を変更した後は、サービスを再起動します:
```bash theme={null}
openclaw gateway restart
```
新しい token を作成する必要はありません — システムが生成したデフォルトの「従量課金優先」token をそのまま使用します。
### 手順 5: エンドポイント互換性を選択
**Endpoint compatibility** オプションで次を選択します。
```text theme={null}
OpenAI-compatible (Uses /chat/completions)
```
主に Claude モデルを使用し、Prompt Caching などのネイティブ機能が必要な場合は、代わりに `Anthropic-compatible` を選択できます。詳細は [Anthropic Native Configuration](/ja/scenarios/agent/openclaw/config-anthropic) を参照してください。
### 手順 6: Model ID を設定
**Model ID** フィールドに、使用したいモデル名を入力します。例えば:
```text theme={null}
gpt-5.4
```
その他の選択肢: `claude-sonnet-4-6`, `deepseek-v3.2`, `gemini-3.1-pro-preview`, など。
### 手順 7: 検証して完了
OpenClaw は自動的に設定を検証します。成功すると、システムは **Endpoint ID**(例: `custom-api-apiyi-com`)を生成し、セットアップ完了となります。
検証プロセスでは、まれにエラーが返ることがあります — 通常は再試行で成功します。何度も失敗する場合は、API key が正しいことと、ネットワーク接続が安定していることを確認してください。
### 設定サマリー
| パラメータ | 値 |
| ------------- | ----------------------------- |
| Provider | カスタムプロバイダ |
| API Base URL | `https://api.apiyi.com` |
| Compatibility | OpenAI互換 |
| Endpoint ID | `custom-api-apiyi-com` (自動生成) |
## 設定を変更する
初期設定後、`configure` コマンドを使って対話型設定に再度入ります:
```bash theme={null}
openclaw configure
```
以下の項目を設定する対話型設定メニューが開きます:
* モデルプロバイダーとデフォルトモデル
* チャットチャネル設定
* スキルの有効化/無効化
* ゲートウェイパラメータ
## 単一設定コマンド
個別の設定項目をすばやく確認・変更できます:
```bash theme={null}
{/* View current config value */}
openclaw config get agents.defaults.model.primary
{/* Set config value */}
openclaw config set agents.defaults.model.primary "apiyi/gpt-5.4"
{/* Set API key */}
openclaw config set models.providers.apiyi.apiKey "sk-your-key"
```
## Web UI 設定パネル
Dashboard を起動したあと、ブラウザでも設定を管理できます:
```bash theme={null}
openclaw dashboard
```
`http://127.0.0.1:18789/` を開くと、設定ページにアクセスでき、次のことができます:
* モデル設定を視覚的に編集する
* chat チャネル接続を管理する
* 設定済みのスキルを表示して切り替える
* ログと実行状況をリアルタイムで監視する
## サービスを開始する
設定後、ゲートウェイを起動します:
```bash theme={null}
openclaw gateway start
```
設定を変更した後は、サービスを再起動します:
```bash theme={null}
openclaw gateway restart
```