Same model, better output: what consumer image apps add on top of the API — a prompt rewrite layer, reference anchoring, parallel sampling with vision-model selection, and step-by-step retouching. Includes copy-paste realism vocabulary, side-by-side tests, and the cost math.
How to Get the Image You Want answers “this one attempt failed, how do I rescue it.” This page answers the next question: how do I make every attempt land.A question that comes up constantly: consumer image products like freepik.com and higgsfield.ai run on the same base models you do — the same Nano Banana, GPT-Image and FLUX families — yet their output looks more finished. The gap is not in the model weights. It is the layer wrapped around the model, and you can build that layer yourself. This page shows how.
Call a text model to rewrite first, then hit the image model (section 2)
Style presets (dozens of clickable presets, plus saved custom ones)
Freezes an aesthetic so users need no photography vocabulary
A preset is just a prompt-fragment constant in your code plus a fixed set of reference images
Identity anchoring (e.g. Higgsfield’s Soul ID, which trains a persistent identity on 20–80 photos)
Same person stays the same across generations
Approximate it with reference images (see the boundaries below)
Sampling several, showing one
The user only ever sees the best candidate, so the perceived hit rate approaches 100%
Generate N in parallel, then let a vision model score and pick (section 3, steps 3–4)
Step-by-step editing
Compound instructions in one shot reliably break down
Lock composition first, then edit locally, then add text
Upscaling and post-processing (Freepik acquired Magnific in 2024, offering 2×–16× creative upscaling)
Turns small output into print-ready sizes
APIYI has no such endpoint — generate at the high resolution tier instead (see boundaries below)
Negative prompts and safety fallbacks
Steers around known model habits, and catches requests moderation would reject
Bake fixed negative phrasing into your template, plus a downgrade path for moderation failures
Asset library and rehosting
User images never expire or disappear
Copy every result into your own object storage immediately
Two platform boundaries to settle before you copy a competitor’s feature list:
APIYI has no upscaling, background-removal, or face-restoration endpoint. If you need a large image, pick the high resolution tier at generation time (gpt-image-2 at 4K, Nano Banana Pro at 4K) rather than planning to enlarge afterwards. For a transparent background, use official-relay gpt-image-2 with background: "transparent" — it returns PNG with a real alpha channel (seedream-5-0 / seedream-5-0-pro can only be prompted, and alpha is not guaranteed on every call). See How do I generate images with a transparent background.
APIYI does not offer LoRA or identity training. The “train once, lock the face forever” capability behind Soul ID can only be approximated with reference images: the same character will still drift across scenes and lighting changes, and holds best when the new shot stays close to a frontal view and the original lighting. For commercial characters that demand strict consistency, budget for a human review step.
Side-by-side test: one model, one brief, two prompts
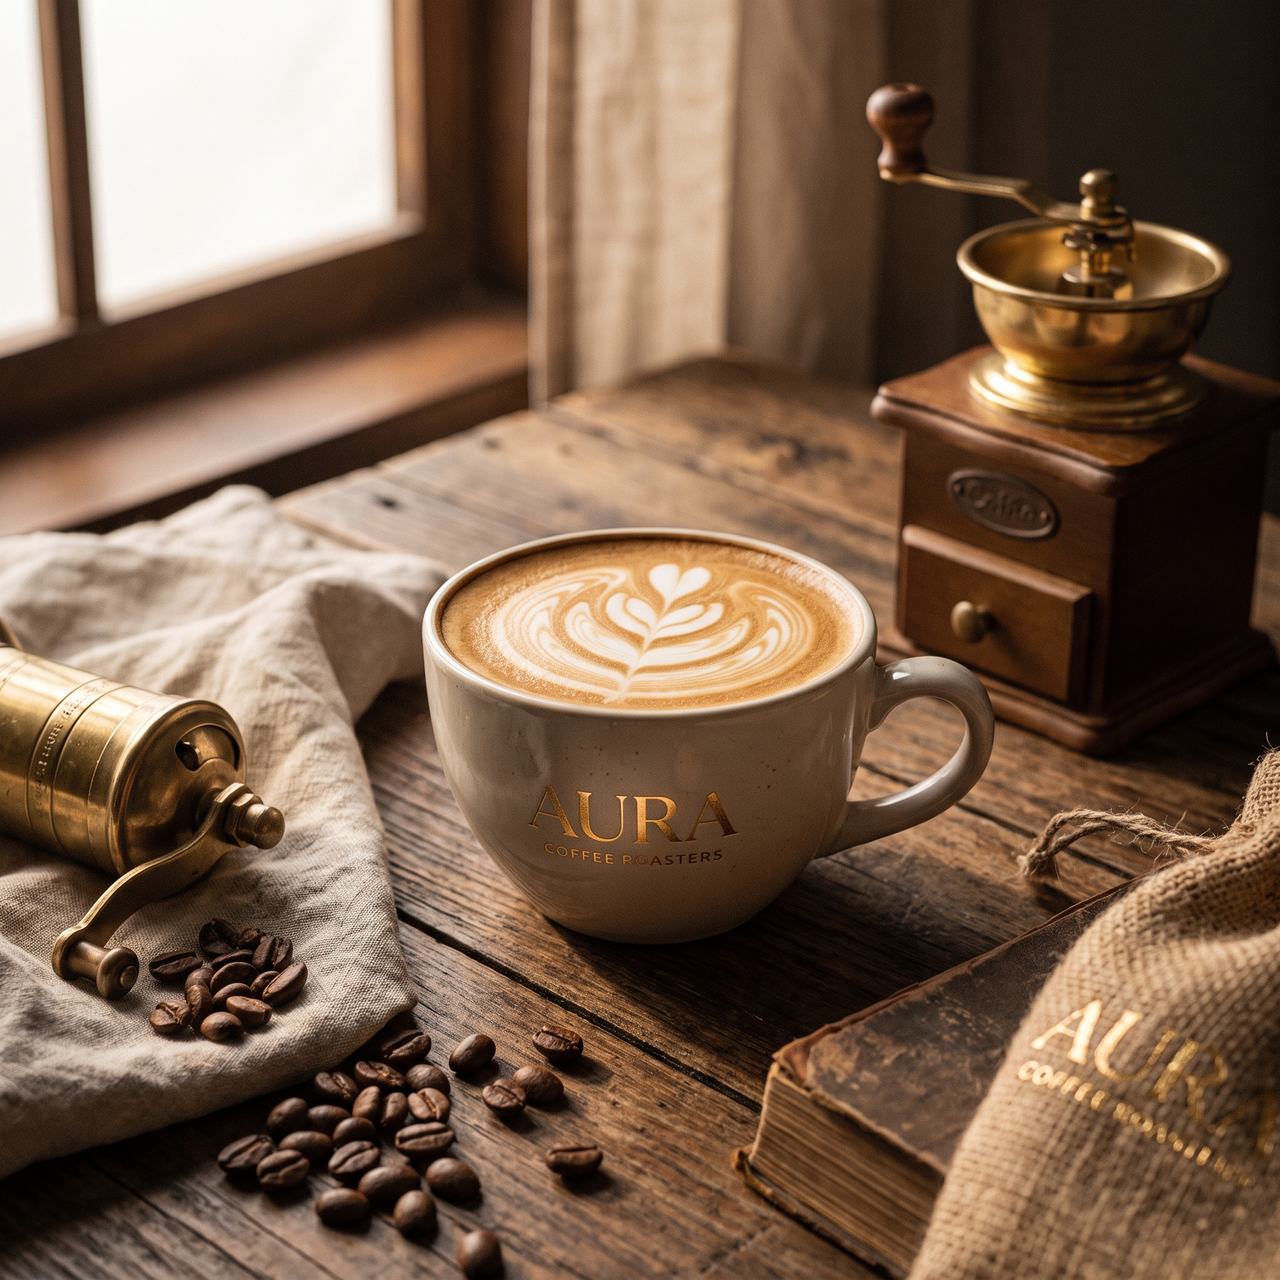
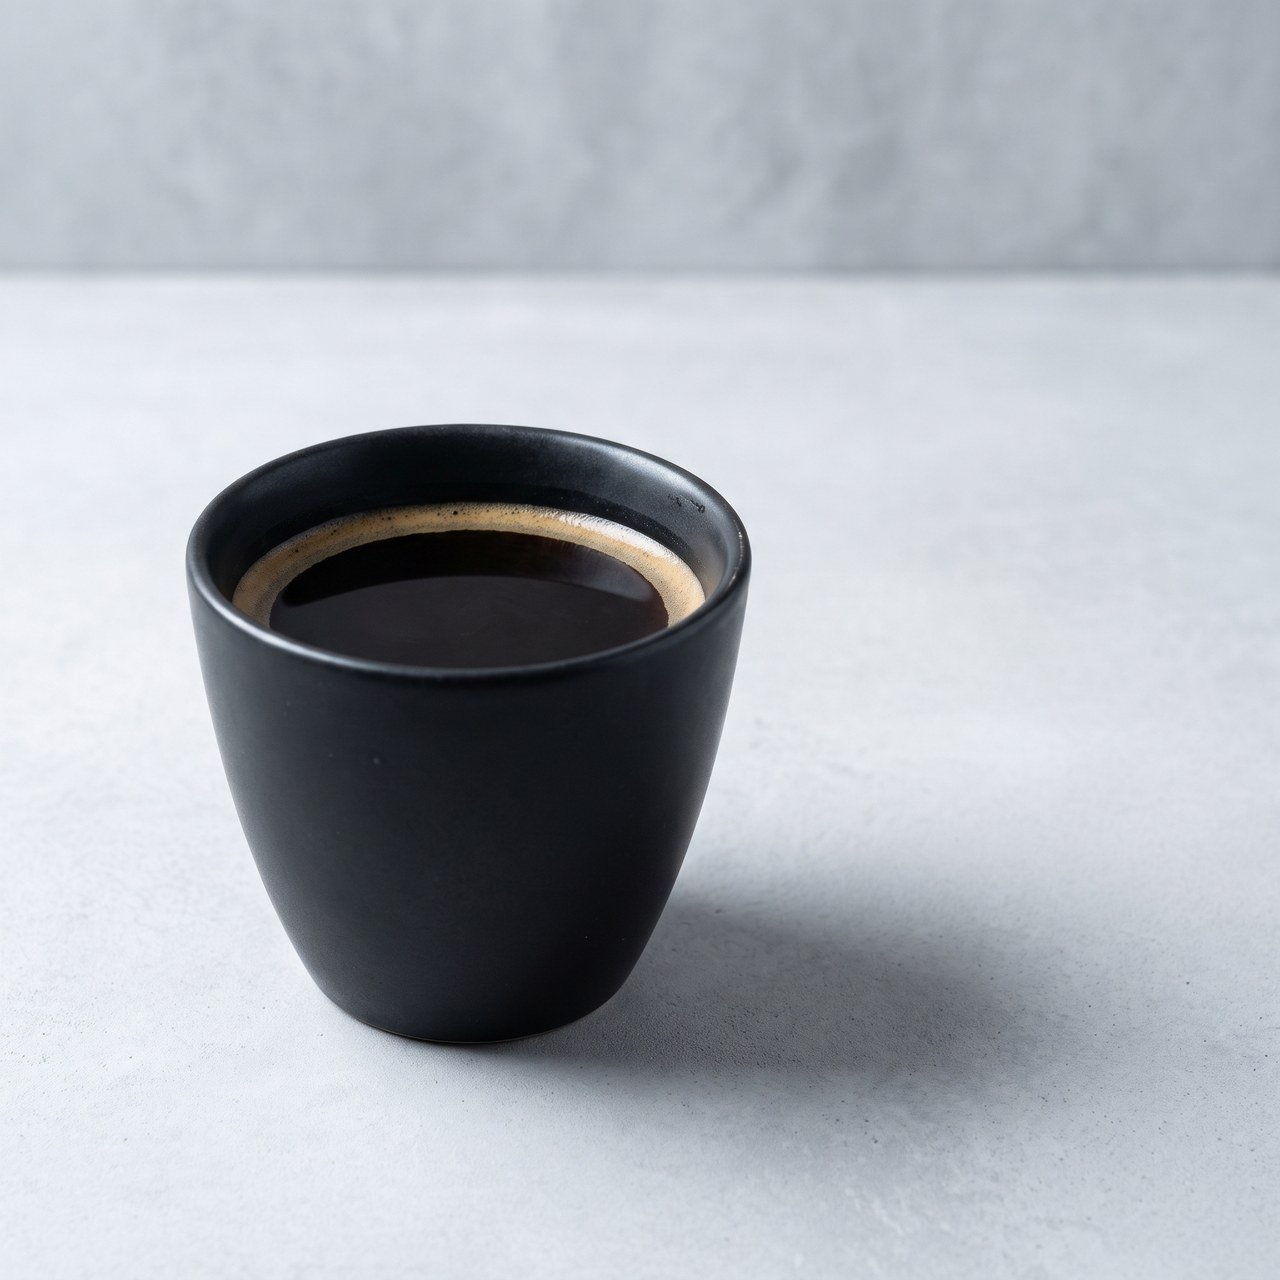
The brief is “an e-commerce product shot for coffee.” On the left is what a user actually types; on the right is the same brief with the missing decisions filled in. Both ran once on gemini-3-pro-image (Nano Banana Pro) at 2K, 1:1:
Casual prompt: 'Make me a coffee product shot, make it look nice, make it feel premium'
Structured prompt: subject, environment, light position, lens, grading, imperfections and composition all specified
The left image is not ugly, but it is unusable. The model made a pile of decisions nobody authorized: it added a grinder and a burlap sack, settled on nostalgic warm grading, and printed an invented brand name on the cup — auto-generated text like that makes the frame worthless commercially. The right image can go straight onto a product page: neutral background, a light setup you can describe out loud, and room for copy.“Looks nice” and “is usable” are different targets. A casual prompt can only reach the first one.
Rewriting does not mean making the prompt longer. It means filling in missing decisions. An image prompt has six load-bearing parts:
Element
What happens without it
Example
Subject
The model improvises and adds props you did not want
”A matte black ceramic pour-over cup, filled to 80% with black coffee”
Environment
Random backgrounds, so a set of images never matches
”Light grey microcement surface, wall in the same tone, blurred”
Light
Flat global illumination that reads as fake instantly
”Key light from a softbox at upper left, 45 degrees; white bounce card on the right”
Lens and angle
Perspective and depth of field are out of your control
”85mm macro, f/5.6, front view angled 15 degrees down”
Grading and medium
Defaults to saturated, rendered-looking output
”Cool neutral white balance, low overall saturation”
Composition
The subject is always dead centre
”Cup on the left third of the frame, large negative space to the right”
Resolution is not a seventh element. Output resolution comes only from parameters such as size / imageSize; writing “4K” or “8K” in the prompt does not add a single pixel. See Image Compression and Output Resolution.
A cheap, fast text model is enough here; its cost is negligible next to generation:
import osimport requestsBASE = "https://api.apiyi.com/v1"API_KEY = os.environ["APIYI_API_KEY"] # never hard-code the keyREWRITE_SYSTEM = """You are an image prompt engineer. Rewrite the user's casual briefinto one structured image prompt.Fill in all six elements. Supply whatever is missing; never ask the user:1 Subject: material, colour, count, state2 Environment: what the background is, what is sharp and what is blurred3 Light: direction, hardness, fill or no fill — there must be one identifiable key light4 Lens and angle: focal length, aperture, camera height, tilt5 Grading and medium: white balance bias, saturation, film or digital character6 Composition: where the subject sits in the frame, where the negative space isRules:- Output only the prompt body: no explanation, no bullet points, no heading- No brand names, logos, or legible text unless the user asked for them- Never use vague quality words such as 8K, ultra HD, masterpiece, perfect- Keep any element the user specified exactly as written"""def rewrite(user_prompt: str) -> str: r = requests.post( f"{BASE}/chat/completions", headers={"Authorization": f"Bearer {API_KEY}"}, json={ "model": "gemini-3.5-flash", "messages": [ {"role": "system", "content": REWRITE_SYSTEM}, {"role": "user", "content": user_prompt}, ], }, timeout=60, ) r.raise_for_status() return r.json()["choices"][0]["message"]["content"].strip()
Chain the remaining four layers onto the rewrite layer and you have the whole thing:
1
Rewrite: casual input to structured prompt
See section 2. This step also neutralizes sensitive content in user input along the way, which measurably reduces how often the request is blocked downstream.
2
Anchor: reference images plus a style constant
Style is pinned by two things: a style constant appended to every prompt (your preset), and a fixed set of reference images.Reference limits differ sharply by family — confirm yours before you design the pipeline:
input_image_2 … input_image_8; klein takes 4, Kontext takes 1
Grok Imagine
1–4
A fifth image returns 400
Two rules to respect: “image 1 / image 2” in the prompt map strictly to array order, so state explicitly which is which; and Grok only honours reference images on /v1/images/edits — passing them to /v1/images/generations silently discards them and still bills you.
3
Sample: generate N in parallel, do not rely on n
The “it nailed it first try” feel of a consumer product is really the product drawing several cards on your behalf.But the server-side n parameter has no effect on most image models (Seedream ignores it outright). To get multiple candidates, fire multiple requests concurrently from the client — the skill pages on this site cap it at 5 at a time. Tune concurrency per channel; some start returning 429 at 2, so add exponential backoff.
4
Select: use a vision model as the judge
Once you have N candidates you must pick automatically, otherwise you have simply pushed the choice onto the user.Send the candidates back to a vision model for scoring over the standard /v1/chat/completions image input; see Vision Understanding for eligible models. Fix the rubric at five dimensions and demand JSON back: instruction compliance, structure and anatomy, text correctness, texture realism, composition.
Do not use /v1/rerank for this. bge-reranker-v2-m3 is a text-only reranking model and does not accept images. Scoring images requires a vision understanding model.
5
Retouch and land it
Adjust locally after the composition is settled — far higher success rate than one compound instruction:
Pixel-level local repaint: only the official-relay gpt-image-2 supports masks; see Mask Inpainting Guide.
Multi-turn cumulative editing: supported on the native Gemini endpoint for Nano Banana models (feed the previous image back as role: "model"); the reverse-engineered routes do not support it.
Rehost immediately: every returned URL is temporary (FLUX about 10 minutes and without CORS; Seedream and R2 about 24 hours), so download into your own object storage as soon as you have it.
import base64import jsonimport osfrom concurrent.futures import ThreadPoolExecutorimport requestsBASE = "https://api.apiyi.com"API_KEY = os.environ["APIYI_API_KEY"]HEAD = {"Authorization": f"Bearer {API_KEY}"}STYLE_CONST = "Cool neutral white balance, low saturation, clean frame with generous negative space."def draw(prompt: str, size: str = "2K", aspect: str = "1:1") -> bytes: """Generate one image (Nano Banana Pro, native Gemini endpoint).""" url = f"{BASE}/v1beta/models/gemini-3-pro-image:generateContent" body = { "contents": [{"parts": [{"text": prompt}]}], "generationConfig": { "responseModalities": ["IMAGE"], "imageConfig": {"aspectRatio": aspect, "imageSize": size}, }, } r = requests.post(url, headers=HEAD, json=body, timeout=600) # headroom for 4K r.raise_for_status() parts = r.json()["candidates"][0]["content"]["parts"] part = next((p for p in parts if p.get("inlineData")), None) if part is None: # HTTP 200 with no image usually means moderation raise RuntimeError("no image returned: " + json.dumps(parts)[:300]) return base64.b64decode(part["inlineData"]["data"])def score(image: bytes, prompt: str) -> dict: """Score a candidate with a vision model; returns per-dimension scores and one issue line.""" data_url = "data:image/png;base64," + base64.b64encode(image).decode() rubric = ( "Score this image and return strict JSON: " '{"instruction":0-10,"anatomy":0-10,"text":0-10,"texture":0-10,' '"composition":0-10,"total":0-50,"issue":"one sentence"}. ' "instruction = does it satisfy the brief below; anatomy = errors in hands, limbs, object structure; " "text = is any text in the image correct (score 10 if there is none); " "texture = does it read as a real photograph rather than a render; " "composition = is the framing usable. The brief:\n" + prompt ) r = requests.post( f"{BASE}/v1/chat/completions", headers=HEAD, json={ "model": "gemini-3.5-flash", "messages": [{"role": "user", "content": [ {"type": "text", "text": rubric}, {"type": "image_url", "image_url": {"url": data_url}}, ]}], "response_format": {"type": "json_object"}, }, timeout=120, ) r.raise_for_status() return json.loads(r.json()["choices"][0]["message"]["content"])def best_of(user_input: str, n: int = 4) -> bytes: prompt = rewrite(user_input) + "\n" + STYLE_CONST # steps 1 and 2 with ThreadPoolExecutor(max_workers=n) as pool: # step 3: client-side fan-out results = list(pool.map(lambda _: _safe(draw, prompt), range(n))) cands = [img for ok, img in results if ok] if not cands: raise RuntimeError("all candidates failed; check moderation or fall back to another model") with ThreadPoolExecutor(max_workers=len(cands)) as pool: # step 4: score in parallel scores = list(pool.map(lambda im: score(im, prompt), cands)) ranked = sorted(zip(cands, scores), key=lambda x: x[1]["total"], reverse=True) return ranked[0][0] # step 5 retouch/rehost hooks in heredef _safe(fn, *args): try: return True, fn(*args) except Exception as e: # one failure must not sink the batch return False, str(e)
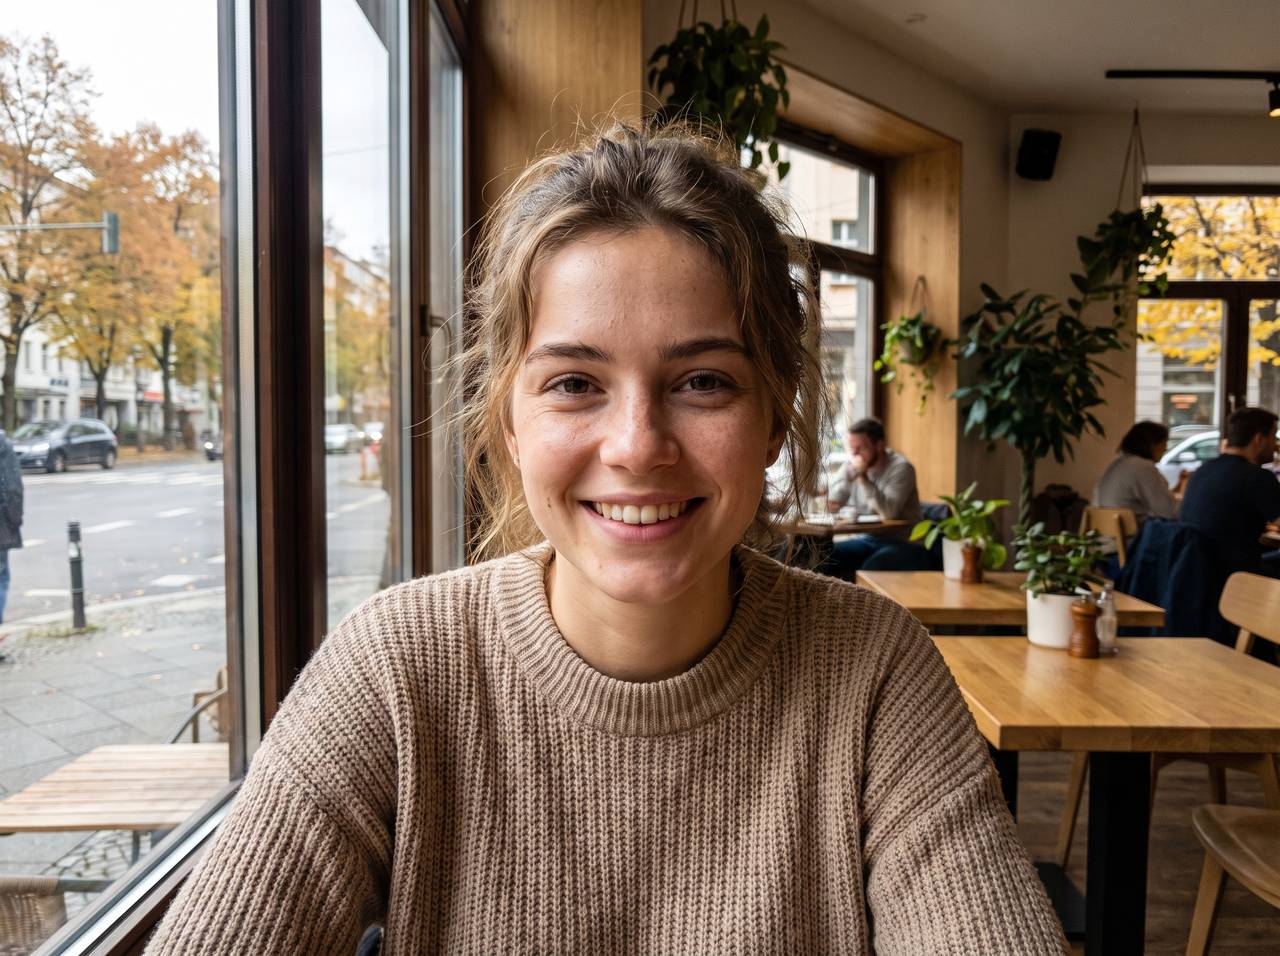
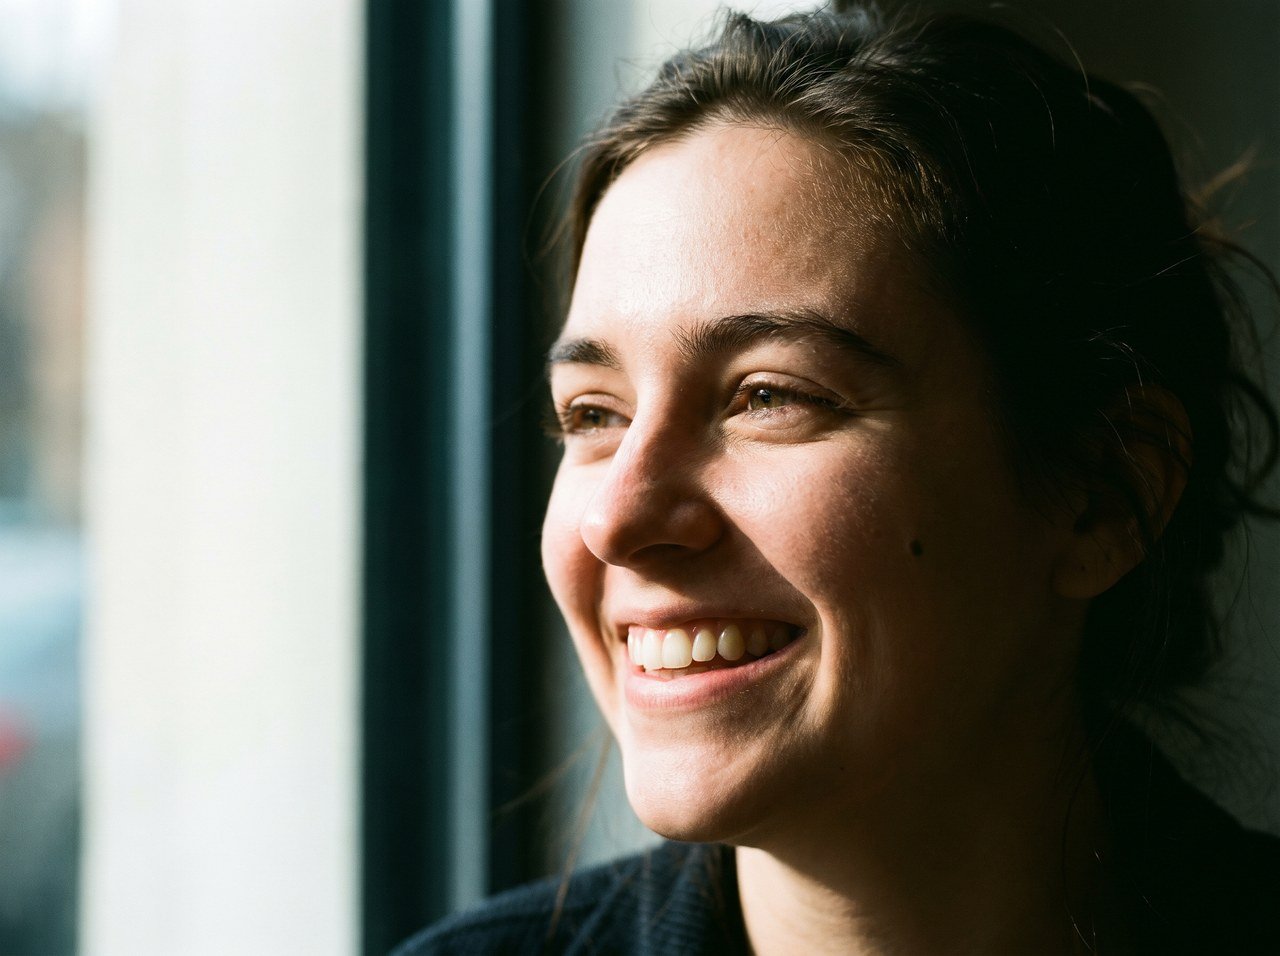
Same model (gemini-3-pro-image), same subject, two prompt styles, two images each, first one shown from each batch:
Bare prompt: 'A photorealistic half-body portrait of a young woman by a cafe window, smiling at the camera, 8K, ultra HD, ultra detailed, flawless skin, beautiful, perfect lighting, masterpiece'
The same subject after adding four blocks of control language: light position, lens, medium, imperfections
The left image is not bad — the base model is strong enough that a bare prompt still yields a good-looking picture. But it carries the full trait set: the subject is locked dead centre, the light is so even you cannot say where it comes from, and every element is agreeable. And it is not a fluke: both images from that batch shared essentially the same framing and lighting pattern.The right image switched approach: the light has a direction, half the face is allowed to fall into shadow, skin shows oil and pores, there is a mole on the cheek, stray hairs are unbrushed, and the subject sits right of centre. It reads as a specific person photographed at a specific moment, rather than “stock image of woman smiling in cafe.”
This is also where the real value of a pipeline shows. It does not turn ugly output into pretty output — it turns “lucky good” into “the good you specified, can describe, and can reproduce.” A stakeholder might not prefer the right image, but with the left one you cannot say why it looks the way it does, and you cannot ask the next image to match it.
Specify placement: “subject right of centre, negative space at left"
"perfect composition”, “golden ratio”
Plastic skin with no pores
”natural skin texture, visible pores and facial fuzz, slight shine on the nose, no retouching"
"flawless skin”, “exquisite”, “beautiful”
Even light with no identifiable source
Name one key light and its hardness: “window light from the left is the only source, right half of the face in shadow"
"perfect lighting”, “soft lighting”
Fake depth of field, background looks pasted on
Give focal length and aperture: “85mm, f/2.8, focus on the near eye"
"blurred background”, “cinematic”
Oversaturated, glowing colour
Give medium and white balance: “Kodak Portra 400 character, warm highlights and cool shadows, low saturation"
"vivid colours”, “HDR”
Everything brand new and unworn
Add wear deliberately: “pilled sweater, water rings and crumbs on the table"
"clean and tidy”, “premium texture”
Reads like a poster or a render
Specify the shooting situation: “candid”, “eye level from the next table"
"8K”, “ultra HD”, “masterpiece”
Vague quality words such as 8K, ultra HD, ultra detailed, masterpiece and perfect are a net negative. They add no resolution (only parameters do that) and they push the model toward an over-sharpened, oversaturated render — precisely the core of the AI look. The left-hand prompt above was stuffed with them, and the result shows it. If you want quality, write specific light, lens and medium instead.
Mix into the prompt as needed; one or two lines from each block is usually enough:
Light
window light from the left is the only source in frame / hard back-side light at three in the afternoon / backlit, with a rim light on the hair / a desk lamp as a practical light inside the frame / overcast diffuse light with no distinct shadows
Lens
35mm f/2.0, candid, at eye level / 85mm f/2.8, focus on the near eye / 24mm from a low camera position, slight edge distortion / long lens compressing the space, flattened background layers / mild vignetting in the corners
Medium
Kodak Portra 400 character, fine grain / warm highlights, cool shadows / Polaroid instant film, low contrast, soft edges / noise and colour cast of an early CCD digital camera / low saturation overall, no sharpening
Imperfections
natural skin texture, visible pores and facial fuzz / a few loose strands of hair, unbrushed / pilled sweater, worn cuffs / water rings, fingerprints and crumbs on the table / off-centre framing, part of the subject cropped at the edge
Candid half-body portrait: a woman in her mid-twenties by a cafe window, turned to the side, looking out, a smile she is not quite holding back. Window light from the left is the only source in the frame; the right half of her face falls into shadow, with a small hard-edged shadow under the bridge of her nose. 85mm lens, f/2.8, eye level, focus on the near eye. Kodak Portra 400 character with fine visible grain, warm highlights and cool shadows, low saturation overall. Natural skin: visible pores and facial fuzz, a little shine on the side of the nose, a small mole on the left cheek, a few stray eyebrow hairs, loose strands of hair unbrushed at the forehead. No skin smoothing, no beauty retouching, no sharpening. Subject right of centre, negative space at left.
Product shot: ready for a product page
E-commerce hero shot: a matte black ceramic pour-over cup filled to 80% with black coffee, a fine ring of crema on the surface. It sits on a light grey microcement surface, with a wall in the same tone blurred behind it. Key light from a softbox at upper left, 45 degrees; a white bounce card at the right leaves a narrow highlight along the right edge of the cup; a soft cast shadow falls to the rear right. 85mm macro lens, f/5.6, front view angled 15 degrees down, the whole cup sharp. Cool neutral white balance, low saturation overall. The glaze has slight handmade unevenness and one tiny kiln mark, and the rim shows a very faint trace of use. Generous negative space, cup on the left third of the frame. No brand names or text anywhere in the image.
Environment: give it a specific time and weather
A narrow old-town street at six in the evening, just after rain, puddles reflecting the light boxes of the shops on both sides. The only key light is a warm street lamp at the end of the street, with shop windows as fill, and a trace of cold dusk still in the sky, setting up a warm-cool contrast. 28mm lens, f/4, camera at eye level, tilted slightly up. Low saturation overall, noise retained in the shadows, no shadow lifting. The walls carry water stains, torn old posters and air-conditioning units; power lines cross the upper part of the frame. Nobody faces the camera; the passers-by are seen from behind and slightly motion blurred.
Seed is effectively unavailable across this product line: no Nano Banana or GPT-Image model exposes a seed, Seedream 4.x / 5.x seeds have been measured as ineffective, and Grok Imagine does not support one
Do not build reproducibility on seeds. The only reliable reproduction is archiving the full successful request — prompt, reference images, every parameter — and replaying it verbatim
The server-side n parameter has no effect on most image models
Multiple candidates must come from client-side concurrency; load-test the concurrency per channel and add exponential backoff
All image APIs are synchronous, have no task ID, and still bill on disconnect
No upscaling, background-removal, or face-restoration endpoint
Settle the output size at generation time; for a transparent background pass background: "transparent" to gpt-image-2 (not a cutout endpoint — it generates on transparency directly)
HTTP 200 with no image usually means a moderation block
Selection logic must distinguish “no image came back” from “an image came back and it is bad”; for the former see Gemini Image Error Handling
Every returned image URL is a temporary link
Rehost the moment you receive it; never store the upstream URL in your database
GPT-Image prompts are capped at 32,000 characters (provider limit, counted in characters)
Do not paste brand books or packaging specs straight into the image model; distill them with a text model into a 1K to 3K character structured prompt first, see Long Prompts
A pipeline trades money for success rate. Output dominates image cost (gpt-image-2 bills output at $30 per million tokens), while the text and vision models used for rewriting and scoring are close to noise. So cost is essentially “how many candidates did you generate.”Use three tiers rather than one setting for everything:
Tier
Composition
Relative cost
Use for
Draft
Single shot from a Lite model
1×
Internal previews, bulk placeholders, casual user experiments
Standard
Rewrite + 2 candidates + scored pick
about 2×
The default path in a consumer product
Premium
Rewrite + 4 candidates + scoring + one local retouch
about 5×
Product hero images, ad creative, anything delivered externally
The test is simple: will anyone outside your team see this image? If yes, Standard or above pays for itself; if it is an internal glance, Draft is enough. You can also add a gate in between — only generate more candidates when the top score falls below a threshold, which lets most requests converge at two.
The gap is not in the model weights, it is in the eight layers around the model: rewrite, presets, anchoring, sampling, selection, step-by-step editing, post-processing, rehosting.
The rewrite layer has the best return: fill in subject, environment, light, lens, grading and composition, and “looks nice” becomes “is usable.”
Multiple candidates plus vision-model scoring is where the high perceived success rate of consumer products actually comes from. n does not work, so fan out client-side; /v1/rerank cannot score images.
Removing the AI look means adding specifics, not adjectives: name one light source, give focal length and aperture, specify medium and grain, add imperfections on purpose, and move the subject off centre.
8K / masterpiece / perfect lighting are net negatives — no extra resolution, and they push the frame toward a rendered look.
Do not count on seeds for reproduction; archive the full request instead. Image APIs are synchronous and bill on disconnect, so the pipeline needs a queue.
APIYI has no upscaling, background-removal, or identity-training endpoints; design around those layers from the start.