

Overview
WorkBuddy is Tencent’s AI Agent office product built around a new paradigm: state your requirement, let it run the task, receive a finished deliverable. Unlike conversational AI that only offers suggestions and text replies, WorkBuddy understands natural-language instructions, breaks the task down on its own, plans the steps, and carries out the operations. It handles multimodal work — documents, spreadsheets, slide decks, data analysis — and can read an authorized local folder for batch processing, delivering results you can actually sign off on (weekly reports, meeting minutes, decks, data dashboards). WorkBuddy ships with mainstream models built in — Hunyuan, GLM, MiniMax, Kimi, DeepSeek (provided through Tencent Cloud’s Token Plan) — and also lets you plug in any third-party large model as the underlying engine via Model configuration. Connecting APIYI gives you:ℹ️ Product info: WorkBuddy is made by Tencent. Websitewww.workbuddy.cn, official docswww.workbuddy.cn/docs/workbuddy/Overview.
Install
WorkBuddy currently offers Windows / macOS desktop clients. Download the installer from the website and double-click to install — no command line needed:
Once installed, open WorkBuddy, sign in, and you can issue a task in one sentence from the New task bar — or follow the official “Quick Start” / “Your First Task” walkthroughs to get familiar with the basics.
Connecting APIYI
WorkBuddy’s model configuration dialog supports OpenAI-compatible protocol APIs only (the dialog says so at the top). APIYI provides a standard OpenAI-compatible API, so picking the Custom provider is all it takes — and you get the whole model matrix at once (GPT / Claude / Gemini / DeepSeek / Zhipu / Kimi and more).Graphical configuration (the only method, recommended)
In WorkBuddy, open Settings → Models, click Add model, and fill in the fields as follows: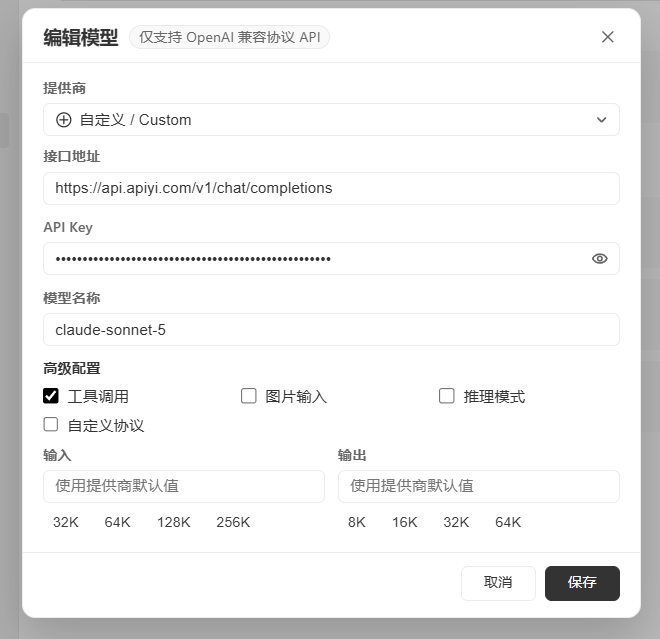
ℹ️ About the capability flags under “Advanced options”: when you pick a standard provider such as Tencent Cloud’s Token Plan, flags like tool calling and image input are filled in automatically. When you pick Custom to connect APIYI, they are not auto-detected — you have to tick them manually based on what your model really supports:The Input and Output sections set context length and maximum output tokens. Leave them blank to use the provider’s defaults, or pick a preset — 32K/64K/128K/256K for input, 8K/16K/32K/64K for output. Click Save, return to the chat view, and the model will appear under the Custom group in the model picker, ready to use.
- Go by the actual capabilities of the model ID you entered. When unsure, tick fewer rather than more — in the screenshot above, the
claude-sonnet-5example has only tool calling enabled- Only add Image input / Reasoning mode after you’ve confirmed the model genuinely supports vision or enhanced reasoning
- Ticking a capability the model doesn’t have (for example enabling tool calling on a model that doesn’t support it) can cause request errors, so tick only what you need
⚠️ Enter the endpoint in full asExtra tip: when creating a token athttps://api.apiyi.com/v1/chat/completions— the complete path ending in/chat/completions, as shown in the screenshot. An incomplete address such ashttps://api.apiyi.comorhttps://api.apiyi.com/v1will cause requests to fail.
api.apiyi.com/token, some groups carry a discount (the ClaudeCode group, for instance), and it stacks with top-up bonuses. The console is authoritative for current rates.
💡 Why APIYI?
- One key, many vendors: OpenAI / Anthropic / Google / DeepSeek / Zhipu / Kimi and the rest of the matrix — configure once in WorkBuddy
- Price advantage: typically 5%–20% below official pricing, with top-up bonuses on some models
- Direct access from mainland China: reach overseas models without a proxy, so the WorkBuddy desktop client needs no extra network setup
- Standard OpenAI-compatible protocol: matches WorkBuddy’s Custom provider requirements exactly, with no need to turn on the custom-protocol switch
ℹ️ Costs and privacy: all costs generated by custom models (token consumption and so on) are settled directly with APIYI, so keep an eye on your APIYI balance and usage. Your API key is stored only in workbuddy/models.json on your machine — WorkBuddy does not upload it to the cloud. Keep it safe, and delete or clear the configuration in Settings when you stop using it.
Feature quick reference
FAQ
After connecting APIYI, will my API key be uploaded to WorkBuddy’s cloud?
No. The official docs state explicitly that model configuration parameters (including the API key) are stored locally inworkbuddy/models.json and are not uploaded to the cloud. At runtime WorkBuddy acts only as the transport link, forwarding your input to the APIYI endpoint you configured; the output comes straight back from that model. Beyond what’s required for transmission, security auditing, troubleshooting, and legally mandated retention, WorkBuddy does not read or store conversation content.
How are the costs of calling models through APIYI calculated? Do they consume WorkBuddy credits or plan quota?
They don’t touch WorkBuddy’s own credits or plan quota. All costs from custom models (token consumption, subscription fees, and so on) are paid and settled by you directly with APIYI, so keep an eye on your APIYI balance and usage to avoid unexpected spending.Does it support the Anthropic native protocol (anthropic_messages)?
Not currently. WorkBuddy’s custom model dialog supports OpenAI-compatible protocol APIs only (clearly labeled at the top of the dialog). So when connecting APIYI, use its OpenAI-compatible endpoint https://api.apiyi.com/v1/chat/completions — the Anthropic native endpoint is not supported for now.
When do I need the “custom protocol” switch, and how complete must the endpoint be?
The custom protocol switch is only needed when the model service you’re connecting sits behind a gateway or proxy layer that uses a non-standard URL path — turning it on makes WorkBuddy skip path validation and send the request to exactly the address you entered. APIYI serves the standard/chat/completions path, so leave the switch off (its default). Either way, enter the endpoint in full as https://api.apiyi.com/v1/chat/completions (ending in /chat/completions). Don’t enter only the base address (https://api.apiyi.com or https://api.apiyi.com/v1), and don’t duplicate /v1 — .../v1/v1/chat/completions will 404.
How should I tick tool calling / image input / reasoning mode?
With standard providers such as Tencent Cloud’s Token Plan, these flags are written in automatically. With Custom connecting APIYI they aren’t auto-detected, so tick them manually according to what the model ID you entered really supports. When unsure, tick fewer rather than more. In the screenshot above,claude-sonnet-5 has only tool calling enabled; add image input or reasoning mode once you’ve confirmed your model supports them. Ticking a capability the model doesn’t have can cause request errors.
What goes in the “Model name” field?
The model ID from the APIYI docs — for exampleclaude-sonnet-5, gpt-5.4, deepseek-v3.2, gemini-3.1-pro-preview, or kimi-k2.6. To switch models, just edit that field in Settings and save; there’s no need to reconfigure the endpoint or API key.